
https://evemaps.dotlan.net/
Description
Dotlan is a mapping website of New Eden run by Wollari (Daniel Hoffend). Its main feature is the dispplay of maps of all regions of the game. However, there are many other features available. These include :
- A map of the entire New Eden universe
- The display of regional maps according to the criteria of your choice
- Sovereignties (TCU and iHub owners, ADM, vulnerability, etc.)
- Solar systems characteristics (security, constellation, region, etc.)
- General information (stations, DED complex, etc.)
- Ressources (moon goo, planet's types, etc.)
- Live information
- A detailed sheet of each solar system, containing lot of information
- Basic solar system information
- PVP activity level (number of jumps in the solar system, number of destroyed ships)
- PVE activity level (number of killed NPC)
- The NPC stations, if any
- Changes of ownership of solar systems with sovereignty
- Statistics on interesting topics
- The most violent solar systems in the last 3 hours
- The main sovereignty ownership changes in the last 7 days
- The main alliance membership variation in the last 7 days
- Navigation tools
- Jump planner
- route planner
- Range calculation tool (for jumps)
- General
- Moons within jumping range
- Planets within jumping range
- Jump bridges
- Cynos
- Detailed information about all corporations and alliances
- Détails about factionnal warfare
It is certainly one of the most used mapping website, and one of the most complete. The interface is designed for readability and emphasizes simplicity. It also allows the download of maps in PDF or image format.
Most of its features are available without having to log in. However, the jump bridges and cynos tools require to log in.
WARNING : we recommend that you avoid connecting your Eve Online account to a website if it is not mandatory. Also, if you choose to connect your Eve Online account on a website, be sure to check what access are requested, and make sure that you are comfortable sharing those information with the website.
To help you navigate in this web page, you can access directly to the subject that interests you in the following menu :
Interface presentation
Here is the website's interface :
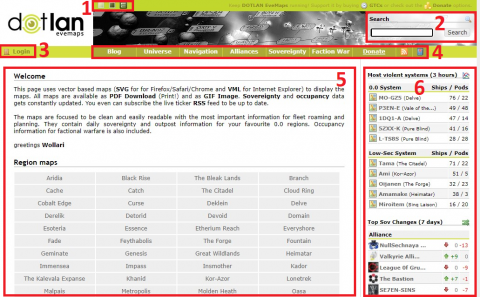
- Interface customization buttons (available on each website's pages) - You can customize the interface by choosing between light or dark interface. From now on in this article, we'll use the dark interface.
- Reaserch field (available on each website's pages) - There you can do a quick search. You can enter the name of a region, solar system, corporation or alliance, and the website will redirect you to the related page.
- Log in button (available on each website's pages)
- Toolbar (available on each website's pages)
- Main content section - The content of this section will adapt accordignly to your choice in the toolbar.
- Statistics panel
How to use the website
In this section, we present the three main features of the site corresponding to the everyday needs of alliance members. Note that other specific features are available on Dotlan's website and we invite you to explore it for yourself to discover them.
Mapping features
There is two ways to access mapping features :
- The "Universe" button, in the toolbar
- By clicking on the name of a region in the main content section of the home page
When you click on the "Universe" button, the website displays a schematic map of all of New Eden.
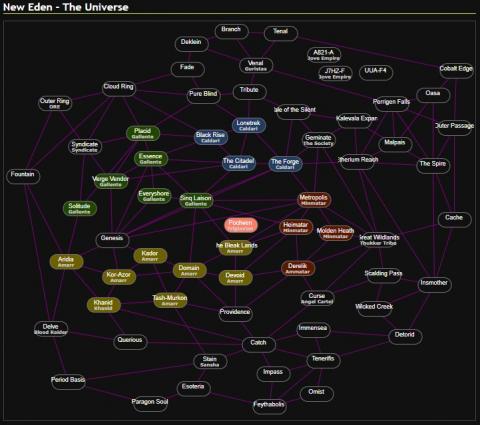
Warning: Remember that Dotlan displays a schematic version of the maps. These maps are in 2D and do not represent the exact distance and location of the systems in New Eden's 3D space. Rather, they show the connections between systems and regions, providing an easy-to-read navigation tool.
You can click on the name of a specific region to view the map. For example, if we select the Khanid region, the map of the region is displayed:

- The drop-down menu on the right allows you to change the displayed region. The drop-down menu on the left allows you to select the type of information to display in the map.
- Each system is illustrated by a bubble. The bubble for each solar system will show the information you selected from the drop-down menu in point 1.
- The solar systems in a rectangular box are systems from a region close to the one you have shown. This allows you to quickly see the interconnections between regions.
- Solar systems with NPC stations have a small square to their right indicating the services offered at those stations. You can consult the legend, in point 6, to learn the meaning of each element in this square.
- The interconnections between systems are illustrated by lines. Standard interconnections are shown with regular lines, while connections between constellations are shown with red lines.
- The legend explains the visual elements used in the map.
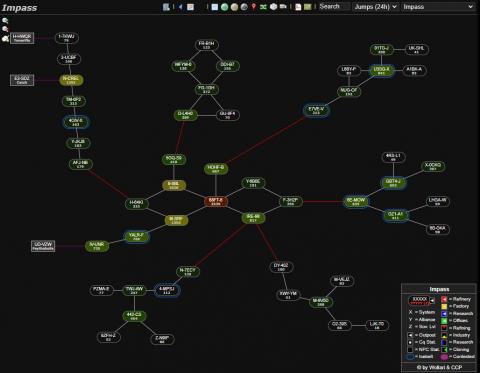
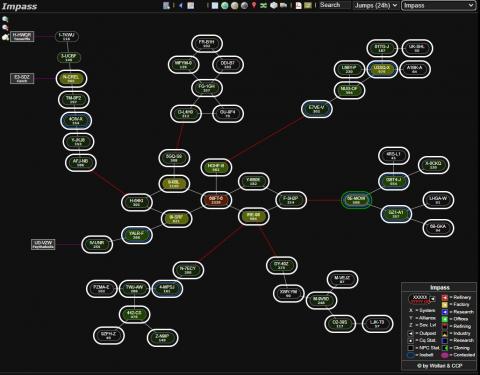
Selecting a different type of information from the drop-down menu in point 1 changes the visual of the map accordingly. For example, if you display the map of the Impass region and select the number of jumps that have occurred in the system in the last 24 hours, this is the result displayed:
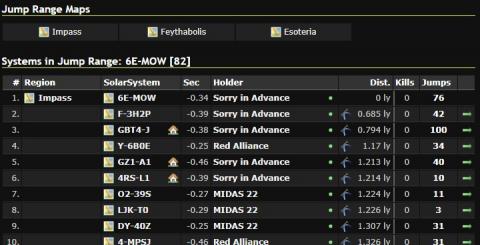
By clicking on a specific system, Dotlan displays the detailed information page for that system. For example, here is the 6E-MOW system page:
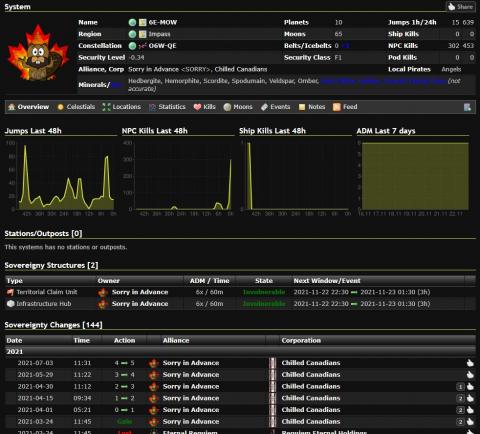
The top section gives basic system information. Just below you have a toolbar that allows you to display additional information on specific aspects of the system (celestial objects, location, stats, kills, moons, etc.)
The following section displays graphs showing, for the last 48 hours, the evolution of the number of jumps, the number of NCP and players ships destroyed. It also shows the variations in ADM over the past 7 days.
The final sections give details of the sovereignty structures of the system, and the changes in sovereignty's ownership.
Navigation features
Navigation features will primarily be of interest to capitals, super capitals, titans, and jump freighters pilots.
These tools allow you to plan routes, as well as the range through bridges or cynos.
They are accessible via the "Navigation" button, in the main menu bar:
After clicking on the button, the Dotlan immediately displays the page of the first tool, the "Jump Planner". At the top of the page is a navigation bar for switching between tools:
Jump Planner
This navigation tool automatically creates a jumps route based on your ship, your skill level, your preferences for solar systems and regions to cross, your access to cyno beacons, etc. You can also manually include specific systems to go through.
WARNING: Dotlan calculates the most optimal path based on the criteria you entered, but it does not do the job of validating whether the selected systems are safe for your passage. It remains your responsibility to properly feed the site for the systems / regions to be avoided, as well as to validate each step of the journey once it has been obtained. Do not hesitate to modify a risky itinerary.
To use it :
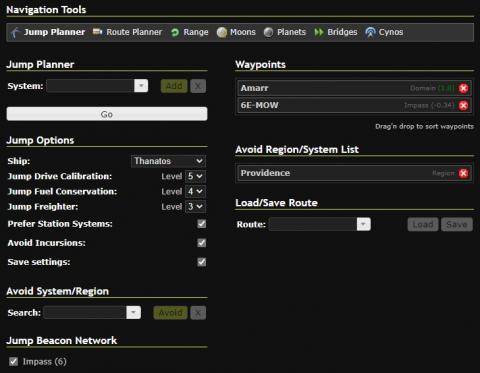
- In the Jump planer section, type in the name of your starting system and select it when it appears in the drop-down menu. Then, click on the “Add” button. This will bring the system in question to the right, in the “Waypoints” section.
- Still in the same place, add the name of the intermediate solar systems through which you wish to go, if there are specific ones, as well as the destination system.
- In the Jump options section, enter the type of ship for which you want to create the route. Also indicate the level of your skills of Jump Drive Calibration, Jump Fuel Conservation and Jump Freighter. You can also check certain options, allowing you to prefer systems with stations and to avoid areas with incursions. You can also check the “Save settings” box to have the information in the “Jump options” section saved for future use.
- In the “Avoid System / Region” section, you can enter any system or region you want to avoid and then click on the “Avoid” button. The systems / regions to be avoided will move to the right in the “Avoid Region / System List” section.
- The "Jump Beacon Network" section is only accessible if you are logged into the site. When this is the case, it allows you to check off groups of cyno beacons that you would have previously entered in the "Cynos" tool, which we will see later in this article.
- The "Load / Save Route" section allows you to save the route in your favorites, to reload it whenever you want. This feature is only available if you are logged in to the site.
- To save a route, click in the field named “Route”, give it a name and click on the “Save” button.
- To load a previously saved route, click on the drop-down menu in the “Route” field, select the desired route from the list, then click on the “Load” button.
- Once all the parameters have been entered, click on the "Go" button.
Here is an example of a route between Amarr and 6E-MOW, avoiding the Providence area:
Here is the result obtained by clicking on "Go":

First, a map showing the route is displayed. Below, a table details the route, with several interesting information:
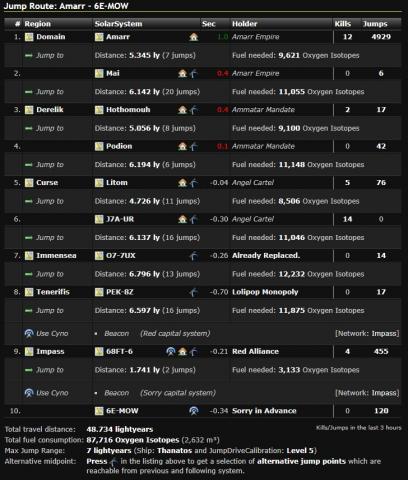
For each system on the route, the table details:
- If stations are available there
- Who owns the sovereignty of the system
- The number of kills and the number of jumps in the last 3 hours
- Any cyno tags you may have entered;
- The distance traveled to reach the next system and the quantity of fuel required
- Finally, a small logo with a blue curve allows, for each system chosen, to select an alternative system
At the end of the table, there is a summary of the route.
Route Planer
This tool allows you to plan a route. Unlike the Jump planner, we are talking about a regular route here, including jumpbridges, if you have entered any in the Bridges utility, which we will discuss later.
WARNING: Dotlan calculates the most optimal path based on the criteria you entered, but it does not do the job of validating whether the selected systems are safe for your passage. It remains your responsibility to properly feed the site for the systems / regions to be avoided, as well as to validate each step of the journey once it has been obtained. Do not hesitate to modify a risky itinerary.
The tool works exactly the same as the Jump planner. The only differences are the options available in the “Route Options” section, where you can indicate your preference for the type of route (faster, preference for high sec or low sec systems). Also note that the "Jumpbridges Network" section is only accessible if you are logged in. If so, you may have entered jumpbridges in the Bridges tool. Then, the "Jumpbridges Network" section would allow them to be selected and used in route calculations.
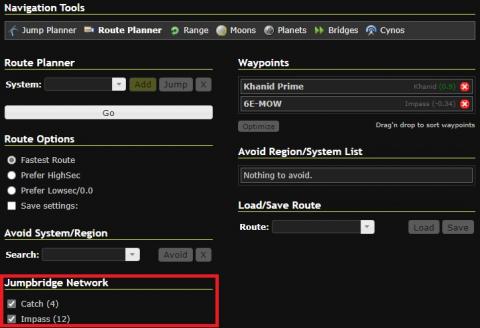
For example, here is what one would enter to create a route from Amarr to 6E-MOW, with stops at Khanid Prime and 68FT-6, all including the jump bridges that I personally entered for Impass:
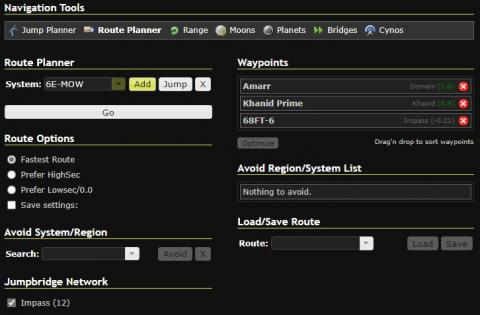
By pressing the "Go" button, the site presents exactly the same result as for the Jump planner tool, a route map as well as a table summarizing all the stages of the journey.
Range
The Range tool is used to validate the radius of accessible solar systems based on different criterias. It can be used, for example, to validate which systems are accessible according to a specific number of gates. We can also validate the systems accessible by jump via cynos and jump bridges, or even the possible range of Jump gates.
It is simple to use :
- In the "Systems in Range" section, select the starting system from which you want to check the range.
- Then, in the “Range Options” section, select:
- The ship (or even an Ansiblex Jump Gate)
- The level of the "Jump Drive Calibration" skill (warning : if you have selected an Ansiblex Jump Gate in the previous step, you must enter a level 1 jump drive calibration skill in order to obtain an accurate range)
- The number of gates, if you want to check which systems are accessible within a radius of x jumps
- The region in which you want to limit the results, if so
- The filter to apply, if you want one
- Check the “Save settings” box if you want to keep the settings for subsequent requests
- Click on the “Go” button.
For example, if you want to check your jump range with a thanatos (carrier) from 6E-MOW with a level 5 Jump Drive Calibration skill, here is how to enter the request:

By pressing the "Go" button, the site first returns a map of all accessible systems, which will be identified in red. In our example above, here is the result:
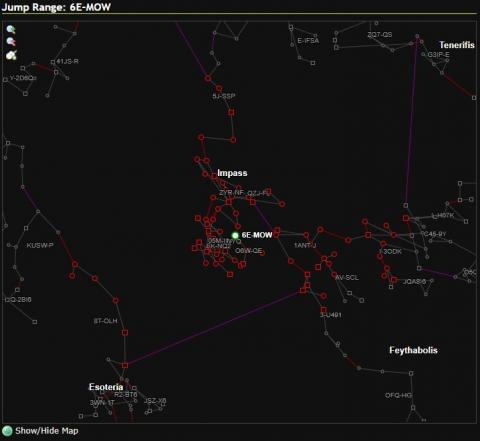
Directly below are clickable links to see the reachable systems by region, followed by a table detailing the accessible systems.
If you click on the link to display only one region, the map will identify the reachable systems by circling them in white. In our example, here are the systems that can be reached in thanatos from 6E-MOW, but only in Impass:
Bridges et Cynos tools
These two tools work exactly the same. They require you to be connected to the site to be accessible, since they will save the information you enter there.
These tools allow you to save jumps bridges and cyno beacons, respectively, which you can then use in the Jump planer and Route Planer tools.
In both tools, your entries will be saved in a network. You can register multiple networks.
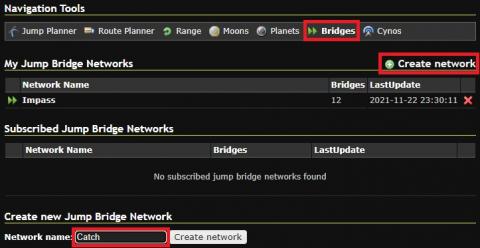
The first step is to create a first network. For example, to create a network of jump bridges accessible in Catch, you must:
- Click on the "Bridges" tool, in the navigation tools, then on the "Create network" choice
- In the "Create new Jump Bridge Network" section which appears at the bottom of the page, give a name to the network to be created. In our example, we could call it Catch. Then, press the “Create network” button.
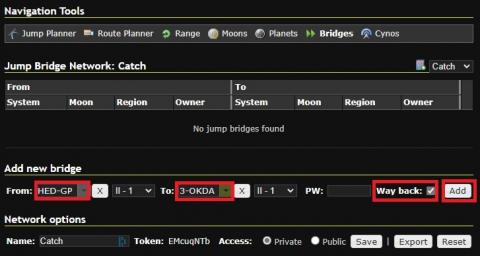
- The site then displays the new network which has just been created and which is empty. To add jump bridges, in the “Add new bridge” section:
- Enter the first system name in the "From" section;
- Enter the name of the second system in the “To” section;
- If you have access to the jump bridge in both directions, make sure the "Way back" box is checked, and uncheck it if you only have access to the jump bridge in one direction.
- Click on the "Add" button.
Note that when adding the home and departure systems, there is a second field where you can identify the exact location of the jump gate in the system, selecting the nearest planet and moon. . This field is optional and has no impact on the functionality of the tool.
- The new jump bridge is added.
- Note that you may need to refresh the page for your new addition to appear.
- If you checked the “Way back” box, your addition will make two lines, one for each direction of the jump bridge.
- Repeat the operation to add all the desired jumps bridges.
- Once your jump bridge network is complete, you can now use it in the "Route Planner" tool by checking it in the "Jump bridge Network" section. In the following example, checking the two networks Catch and Impass will allow the site to generate a route that will take them into account. Of course, you must be logged in to have access to this option in the Route planner.
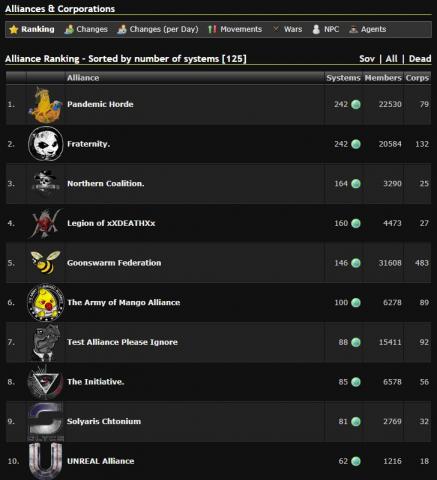
Information about alliances
The section on alliances is available via the “Alliances” button in the main menu toolbar.
You will find various information on the game's alliances there (rank of alliances according to their number of members, sovereignties and corporations, changes in their composition, movements in their number of members, etc.)
This completes the overview of the main features of Dotlan. Do not hesitate to explore the site and discover its other uses.
In closing, do you appreciate Dotlan's services and want to support its author? A "Donate" button, located in the menu bar, will let you know how you can support the site, both in-game and out of the game.